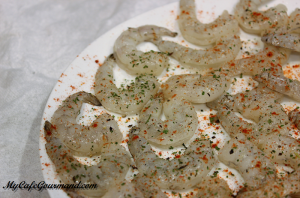
The reason I love making Puff Pastry-Wrapped Shrimp so much is the simple ingredients. And because I almost always have frozen shrimp and puff pastry left in my freezer!

Puff Pastry-Wrapped Shrimps
Ingredients
- 20 medium peeled shrimps
- Salt and freshly ground black pepper to taste
- 1/4 tsp Old Bay Seasoning
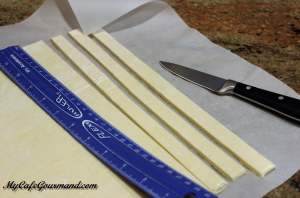
- 1/2 sheet all butter puff pastry
- 1 egg
Instructions
- Preheat oven to 380 degrees F. Cover a large baking sheet with parchment paper.
- Season shrimp with salt, pepper and seasoning.
- Roll out the pastry dough and cut into 1 cm wide strips.
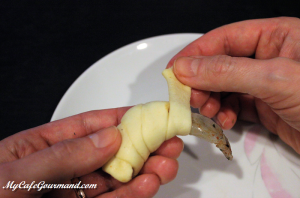
- Starting at the top, wind one pastry strip around one shrimp, slightly overlapping the pastry and ending just before the tail. Repeat with each shrimp.
- Place shrimp onto the baking sheet. Beat the egg in a small bowl with a fork, to make egg wash. Brush the shrimp pastry with egg wash.
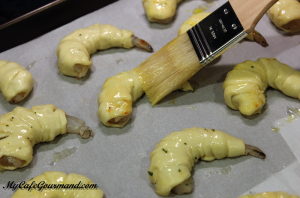
- Bake for about 12 min, or until golden brown. Do not overcook.

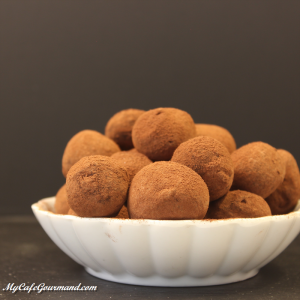
Chocolate Hazelnut Truffles
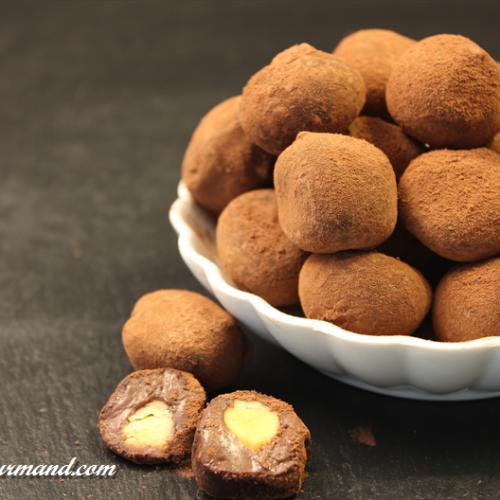
Chocolate Hazelnut Truffles is one delicacy that no one can refuse. The roasted hazelnut compliments the rich cacao powder. Store the truffles in container in the fridge for up to 5 days, but they will disappear from the fridge a lot faster, trust me on this.
Chocolat Hazelnut Truffles
Ingredients
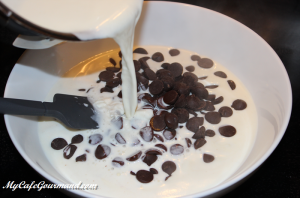
- 150 ml heavy whipping cream
- 200 g dark chocolate (60-70% cacao)
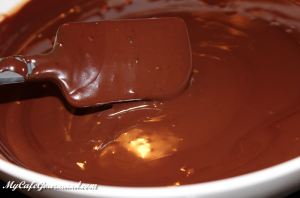
- 50 g unsalted butter
- 30 g hazelnuts
- 2 Tbsp cacao powder
Instructions
- Bring the heavy cream to a boil. Pour the cream over the chocolate chips. Wait 1-2 minutes until chocolate melts.
- Add butter and whisk until smooth. Place it in the frizzer for about 2 hours, until firm enough to roll.
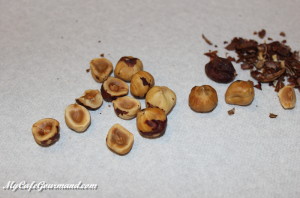
- Preheat oven to 350 degrees F. Spread the nuts in an even layer on the baking sheet, and roast it for 10-15 minutes. Stirring every 3 minutes. Check the nuts. You are looking for the color to be a few shades darker. When the nuts are browned and smell nutty, remove from the oven and transfer onto a plate. Cool it and clean from the flakes. I like my truffles extra tiny, so I cut each hazelnut in half. You don't have to cut them if you are making large truffles.
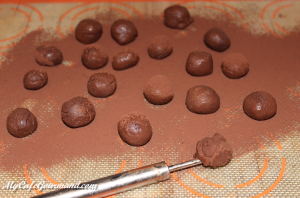
- Use a teaspoon or small cookie scoop to portion the ganache, hide one hazelnut inside each piece, roll the balls between hands, until smooth and place on a plate.

- Roll in cacao powder.
- Refrigerate for at least 1 hour.
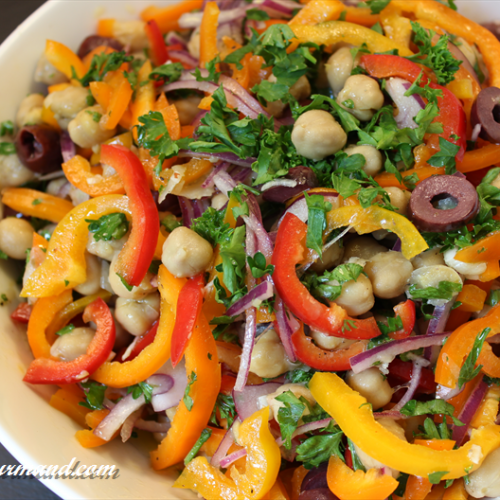
Chickpea salad with bell pepper
Cans are usually pretty handy at home or on the go; there is no need to go to a store and they are quick to prepare. This chickpea salad is a great example of the usefulness of cans. Just open a can and mix it with other ingredients available at home.
There are multiple recipes of salads with this legume: here is one of them with bell pepper, olives and fresh cilantro.
Chickpea salad with bell pepper
Ingredients
- 400 g (1 can) garbanzo beans drained
- 1 bell pepper cored and slices
- 80 g olives (black or green), drained and sliced
- 1 clove garlic pressed
- 1/2 red onion cut into thin slices
- Fresh herbs (cilantro or parsley), finely chopped
- Salt and freshly ground black pepper
- 1 lemon
- 3-4 Tsp olive oil
Instructions
- Combine all veggies in a bowl. Season to taste with salt and freshly ground pepper. Drizzle with freshly pressed lemon juice and olive oil. Toss gently.
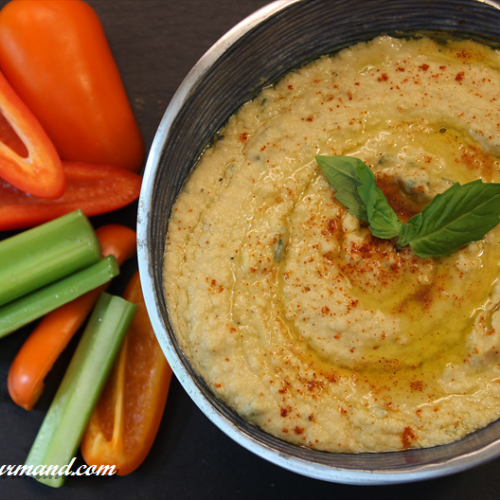
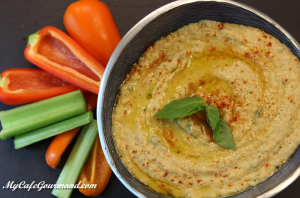
Homemade Hummus
With or without tahini, homemade hummus made from scratch only takes 5 minutes to make. No needs to cook the chickpeas, just open a can and mix with garlic, lemon juice and olive oil! This delicious healthy snack can be serve for any occasion with pita bread or garden vegetables.
Homemade Hummus
Ingredients
- 1 can (400 g) garbanzo beans (chickpea)
- 1 lemon
- 2-3 cloves garlic chopped
- Salt and freshly ground black pepper
- 1 Tbsp tahini (sesame paste) optional
- 3-4 Tbsp olive oil
- A few pinches chili powder (or paprika)
Instructions
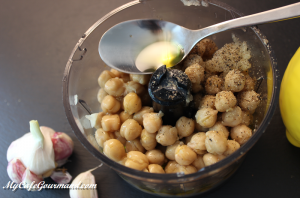
- Drain garbanzo beans, keep half of the juice.
- In a food processor, place the chickpeas, lemon juice, garlic, salt, black pepper, tahini, chili powder and 2 Tbsp of olive oil. Mix until smooth. Add 1 or 2 Tbsp of the juice from the can (or water) to give a desired texture to the hummus.
- Transfer hummus to a serving bowl, drizzle with the rest of the olive oil and sprinkle with chili powder or paprika.
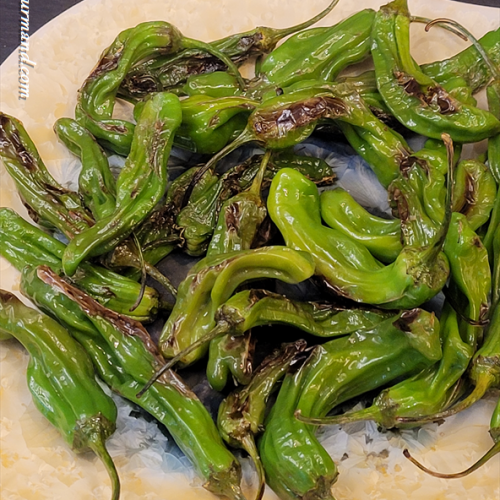
Appetizer Shishito Peppers
You can find shishito peppers in your favorite grocery store. Prepare this super quick recipe in no time and your guests will love this delicious appetizer.
Did you know that 1 in 10 shishito peppers are really spicy?
Appetizer Shishito peppers
Ingredients
- 6 oz Shishito peppers
- a bit of olive oil
- Salt and freshly ground black pepper
Instructions
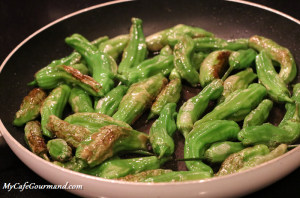
- In a saute pan heat olive oil over medium-high heat.
- Add the shishito peppers and stir for 1-2 minutes, heating them up until they blister. Add salt and black pepper.
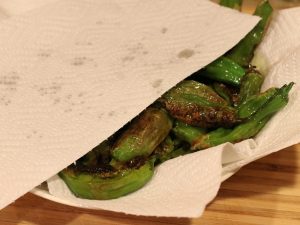
- Place the peppers on a paper towel to remove excess oil and serve.
Baked Feta (Psiti)
Baked Feta (Psiti) is a traditional Greek dish. It is very easy to prepare at home and will become one of your favorite appetizers.
Baked Feta (Feta Psiti)
Ingredients
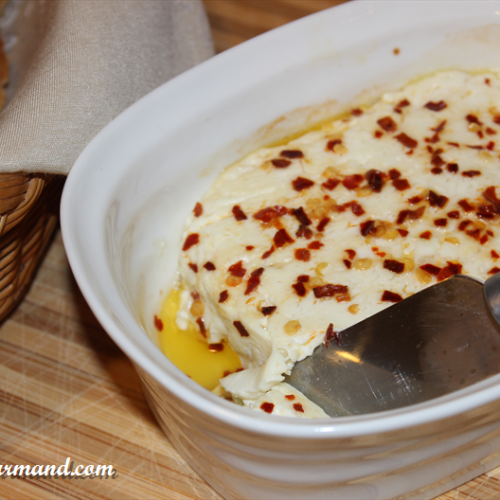
- 200 g feta cheese (in one block)
- 2 pinches oregano
- Some chili pepper flakes
- 1 Tbsp olive oil
Instructions
- Preheat oven to 400F.
- Place the feta in an oven-proof dish. Add the oregano and chili pepper flakes followed by the olive oil.
- Bake for 8-10 minutes.
- Serve hot with fresh bread or pita.
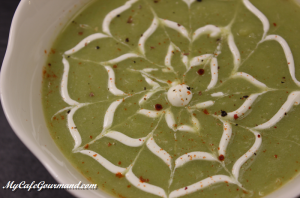
Pureed Pea Soup
Pureed soups are wonderful way to enjoy vegetables. Plus you don’t have to go grocery shopping in order to make this soup. You can find all the ingredients that you’ll need in your pantry. Use any meat you have in your fridge. And same with peas, use any peas you have, it can be frozen, canned or fresh.
Pureed Pea Soup
Ingredients
- 3 Tbsp olive oil
- 200 g chicken fillet
- 1 onion
- 5 potatoes
- 400 g frozen peas (or canned)
- 1,5 L water
- salt and pepper to taste
- some sour cream
Instructions
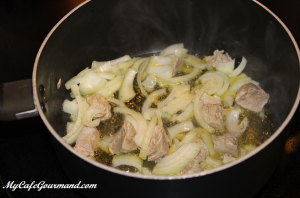
- Cut chicken into small pieces. Peel and chop onion(half-moon). Peel and cut the potatoes in quarters.
- In a large pot, heat the olive oil, add chicken and cook until beginning to golden brown. Add onion and sauté for about 5 minutes, constantly stirring.
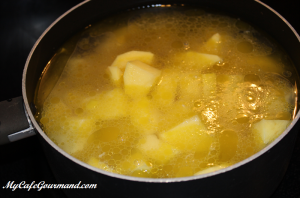
- Add the potatoes and cover with water. Bring to a boil.
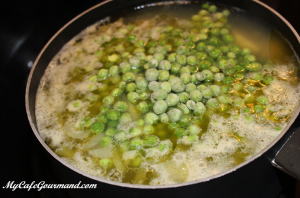
- Add frozen or canned peas(drained). Bring to a boil. Add salt and pepper. Reduce the heat, cover and simmer for another 20 minutes.
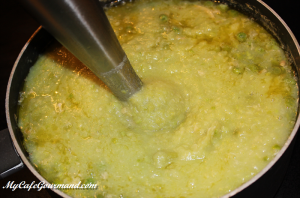
- Puree the soup with blender until smooth. If the soup is too thick, add some water.
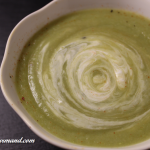
- Divide soup into bowls and top it with sour cream.
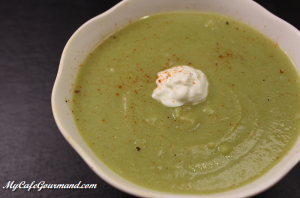
- If you have some extra time, you can make a design on your soup. For this you will need to transfer the sour cream into the small ziplock, cut the tiny hole in the corner(1-2 mm) and use your imagination . 😉
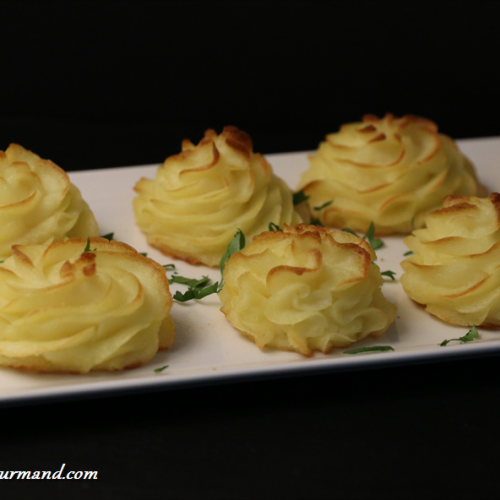
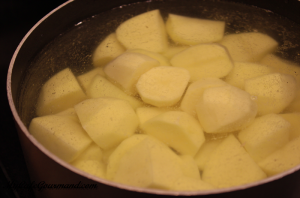
Duchess Potatoes
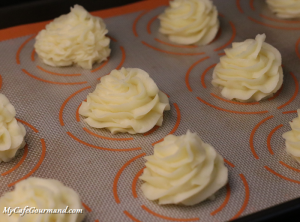
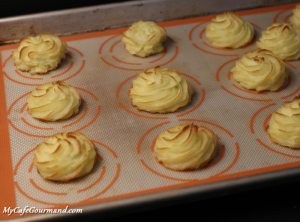
Duchess potatoes (Pommes de terre duchesse) are a French classic recipe made from mashed potatoes with butter and egg yolks. Using a pastry bag, mashed potatoes are formed into roses and baked in the oven until golden brown.
The dish looks very elegant and is served as a side dish for meat, fish or vegetables.
Duchess Potatoes
Ingredients
- 1.5 kg potatoes
- 200 g butter
- Salt and pepper to taste
- A little (on the tip of a knife) grated nutmeg (optional)
- 4 egg yolks
Instructions
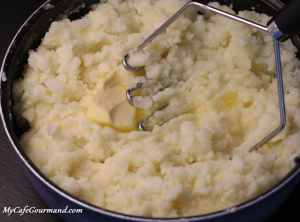
- Peel the potatoes, cut into pieces and boil in salted water. Once the potatoes are cooked (pierce the potatoes with a knife or fork to check), immediately drain the water.
- Mash hot potatoes into a puree, adding butter. Salt, pepper and add nutmeg.
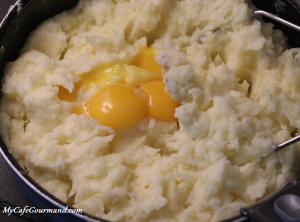
- Add egg yolks and mix very well. Puree should be soft and without lumps.
- Preheat oven to 200C. Line a baking sheet with baking paper or a silicone mat.
- Transfer the puree to a pastry bag fitted with a star tip and pipe the roses of the desired size onto a baking sheet.
- Bake in preheated oven until golden brown, for about 10 minutes.
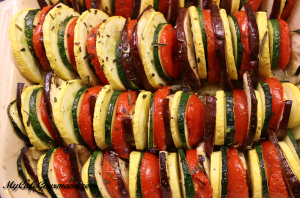
Vegetable Tian
This is not a ratatouille, it is a “tian!” I often have to correct my guests when they ask me if this is a ratatouille. 😉
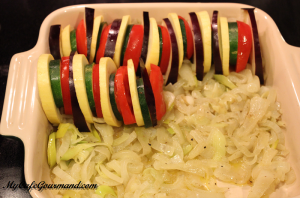
Tian is a french recipe of baked vegetables made with alternating rows of sliced eggplant, tomato, onion and zucchini. A tian itself is an earthenware dish that goes from the oven to table. Everything baked in this dish is called tian.
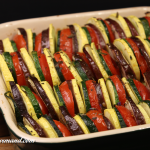
Vegetable Tian
Ingredients
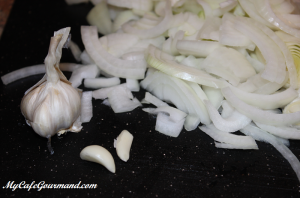
- 2 onions
- 4 cloves garlic
- 7 Tbsp olive oil
- Salt and freshly ground black pepper
- 1 eggplant
- 1-2 zucchini
- 1-2 summer squash
- 5 tomatoes
- 1/2 tsp herbs de provence
Instructions
- Peel and cut the onion into half moons. Peel and cut the garlic into 2-4 pieces.
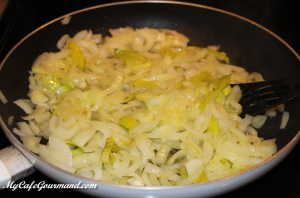
- In a medium skillet heat 2-3 Tbsp of olive oil until hot, add onion and sauté until tender, stirring frequently. Add garlic and cook for another 2 minutes. Season with salt and pepper. Remove from the heat.
- Preheat the oven to 400℉. Spread the cooked onion on the bottom of a baking dish.

- Cut zucchini and summer squash into 1/4 inch slices.
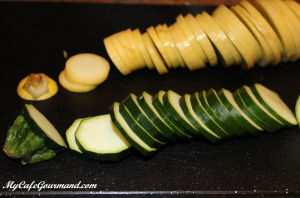
- Cut the eggplant into 1/4 inch slices.
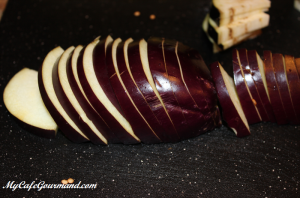
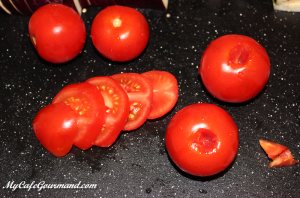
- Core and cut tomatoes into 1/4 inch thick slices.
- Arrange the zucchini, eggplant, squash and tomatoes in alternating rows. Continue until the baking dish is filled.
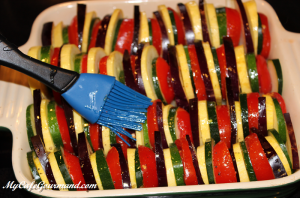
- Sprinkle the vegetables with salt, pepper, Herbs de Provence and drizzle with the remaining olive oil.
- Bake for 40-50 minutes or until the vegetables are soft and golden. If the vegetables are not ready, but the top is starting to burn, cover the tian with aluminum foil.
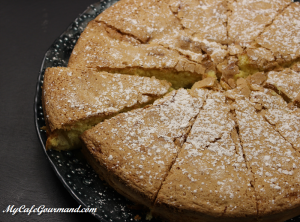
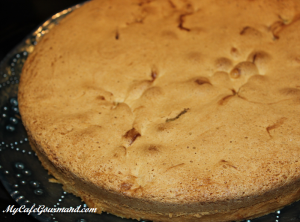
Easy Apple Cake
Delicate and full of apples easy to make cake. Recipe is very similar to famous Russian Apple Sharlotka but with a little of olive oil and baking powder. Must try!
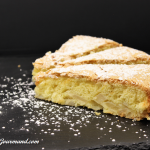
Easy Apple Cake
Ingredients
- 4 eggs
- 200 g sugar
- 150 g sifted flour
- 2 tsp baking powder
- 2 Tbsp olive oil
- 3 big apples Granny Smith
- 1 tsp confectioner's sugar (facultatif)
Instructions
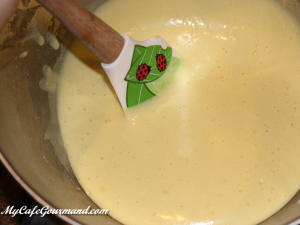
- Preheat oven to 380 degrees F. Grease and flour a round cake pan or line the bottom of the pan with parchment paper.
- Using an electric mixer, beat eggs and sugar. Add flour and baking powder. Mix well, then add oil and mix last time.
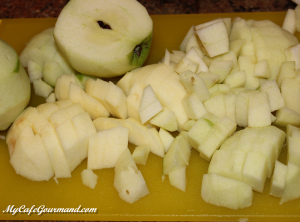
- Peel and dice apples into small pieces. Lay out the apples on the bottom of the pan.
- Pour the batter over the apples.

- Bake for about 45 minutes or until а knife inserted in the middle comes out clean.

- Let the cake cool then transfer to plate.
- Sprinkle with confectioner's sugar.